Sunday, December 29, 2013

Christmas Card Storage Display


Hello everyone! I hope you had a very Merry Christmas! I'm always looking for ways to preserve memories in a way that provides easy access and minimal clutter. I have saved all the Christmas cards I received the past few years, and have been trying to think of a way to save them and display them. I created these 7" x 3" card covers to combine all the cards from each year. It was actually SO easy and the entire project only cost around $7! 


I went to my favorite store Hobby Lobby and found all of the supplies I needed for this project. I loved the Christmas Phrase Foil Stickers by the Paper Studio here. I loved the foil look and that some of them mention our beloved Savior. I also adored these Ornament Glitter Border Stickers by the Paper Studio here. To bind them all together, I used these Sterling Silver Open Jump Rings, found here. I'm sure as more of my friends begin having families and sending Christmas cards, I'll need to use bigger rings, but these worked perfectly for now!


I cut the red and green card stock paper to be 7" by 3". Most of the cards I received are 5"x7", so the 7" length made it look pretty uniform, but I wanted the length to be a little shorter so I could see some of the cards. The cream colored card stock paper is a little less than 5" by 2". I used a regular hole punch to make the holes on the card covers, then I laid the card covers over each Christmas card and traced the holes onto the Christmas cards using a pencil. This helped me hole punch in the right place on each card so they lined up. 


I had enough materials to make a few extras, so I made some for upcoming years too! I love them already and plan to place them out on the coffee table when I decorate for Christmas so we can look through them each year.

Merry Christmas everyone!

For unto us a child is born, unto us a Son is given; and the government will be upon His shoulder. And His name will be called Wonderful, Counselor, Mighty God, Everlasting Father, Prince of Peace. Isaiah 9:6-7.


Friday, December 6, 2013

Outdoor Christmas Apartment Decor

I love LOVE love sitting on my porch. I especially like to sit out there on a warm summer day and drink lemonade and let my dog think the whole apartment complex is her backyard. When it gets cold outside, the sitting on the porch time happens a little less often. Regardless, I wanted to create a little bit of Christmas heaven out there.


I found those presents at HomeGoods for approximately $40. Here is a similar set on Target.com but it's a little more pricey. Those lights on the ledge only took me oh... about 2 hours to hang up. I think it was my first and last time to mess with Christmas lights. :) So worth it though!

Sunday, November 17, 2013

Digital Picture Organization


This project has been in process for approximately the past 2 years. I looooove looking at old pictures and cherishing old memories. Thankfully, my mom was very good at documenting every piece of my childhood through pictures. I'm talking 14 extra-full 12" scrapbooks FULL of my childhood. Plus a few boxes full of pre-scrapbook-days pictures. Each time I return to my parents' house, my sister and I look at old pictures. Most of the time I just snap photos of each picture with my iPhone, but sometimes I actually scan the pictures to my computer. Turning scrapbooks and other old pictures into digital photos has made it even easier to revisit all of these pictures and memories. 

Sorting the pictures is actually very easy! I created a new "Pictures" folder on my computer, and added subfolders for each person in my family. 


I then created subfolders for each person in my family. I used general ages to sort most of the pictures. For current pictures and in the future, I will probably sort them by actual calendar year. 


Now, I can easily find all of our family's sweet old pictures. This one of my grandma, mom, and aunts is one of my very favorites :) 


Sunday, November 10, 2013

DIY Chicken Wire Bulletin Board

I have pictures of my family and friends all over my apartment. I love taking pictures, and I love having them up to look at every day. My brother currently lives in Spain, and lot of my friends live in other cities and states, so seeing their faces in pictures every day makes everyone seem a {little} less farther away.

I found this big white frame in the attic at my parents' house. I went to Lowe's and purchased some chicken wire. The smallest roll of chicken wire I found was about 4ft x 10 ft. Let's just say I have enough left over to make an actual chicken pen. 

I wish I had more pictures for the step by step, but hopefully these finished-product pictures are explanatory enough. 


I laid the chicken wire over the frame and cut it about one inch bigger than the frame. I then nailed half-inch nails every 3-4 inches along the inside of the frame. If one of the pieces of chicken wire was near the nails, I twisted it around the nail. The other pieces of chicken wire are not attached to any nails, they just stay in place.


Picture Organization


Picture Organization Desk Decor


That's it really!

Thursday, November 7, 2013

Fall Decor 2013

Well Christmas has already taken over all of the stores around here, and I am already dreaming about new Christmas decorations! I will probably leave my Fall decorations up until Thanksgiving, but here's a wrap-up of all things Fall.

"Life starts all over again when it gets crisp in the Fall." F. Scott Fitzgerald - The Great Gatsby


Monday, November 4, 2013

5 Things to Stop Wasting Money On


5 Things to Stop Wasting Money On | How to Save Money | Tips For Frugal and Simple Living


So, if you haven't figured it out by looking around my blog a bit, I like my life to be pretty clean, organized, and simple. I think distractions like clutter and messes get in the way of life. I like my house apartment to be clean and available if a guest wants to come over. I like to know where my things are so I don't have to waste time looking for things, or waste money buying replacements. I once heard a quote by William Morris, "Have nothing in your house that you do not know to be useful, or believe to be beautiful." Ever since I heard this, it has pretty much been my motto for organizing everything.

Like I mentioned, I realllllly do not like to waste money. I have student loans to pay for pharmacy school, and I refuse to go more into debt by buying unnecessary things. Here is my list of 5 things that everyone can easily stop wasting money on.


#1: Gift Bags. I know most people hate saving/stashing gift bags hoping to save a few bucks recognize that saving gift bags from gifts that have been given to you is the easiest way to collect gift bags and avoid purchasing them. I have also found that gift bags are one thing worth buying ahead of time when I find a good deal. There will always be another birthday party/wedding/ baby shower to go to where I can use the gift bags I have saved. Gift bags that cost $4+ are NOT a good deal. The DollarTree stores have gift bags for $1 that are sometimes just as cute as the bags at gift shops. Target DollarSpots at the front of their stores often have cute gift bags for $1. Or if you're lucky you can find a 50% Target DollarSpot and buy a few for 50 cents each!

5 Things to Stop Wasting Money On | How to Save Money | Tips For Frugal and Simple Living | Goodness Grace Blog


#2: Cards. Call me old fashioned, but I still send hand-written thank you notes for all gifts I receive. I also like to include a hand written card with every birthday/wedding/baby shower gift I give. Therefore, I go through a lot of cards. This point is similar to tip #1, except definitely don't reuse cards that have been given to you already :) But, cards that cost $4 are not a good deal. An 8-pack of cards for $10 is not a good deal. Look for clearance sales for thank you notes and buy an 8-pack for $2. The Target DollarSpot is another place I find really cute cards for a good price. Target Coupons and Cartwheel also frequently take 20% off greeting cards. Also, the receivers would probably rather you spend the extra $5 on their actual gift than on the cutest card. The handwritten, personal note on the inside of the card is much more important than whatever is on the front of it, I promise!

5 Things to Stop Wasting Money On | How to Save Money | Tips For Frugal and Simple Living


#3: Magazines. As much as I LOVE Pinterest, I also really appreciate flipping through actual pages of actual magazines. But, $4+ per issue at the grocery store will add up very quickly. If you like a certain magazine, the yearly subscription is usually over a 50% discount compared to buying each magazine individually. Also, RecycleBank is a website that allows you to earn points for reading things about recycling. I have used RecycleBank points to buy 5 or 6 different year-long magazine subscriptions for FREE. Sign up for RecycleBank here if you haven't already!

#4: Things we forget when we've left home. Being completely prepared and avoiding last minute purchases is nearly impossible. That's why I keep a little box in the back of my car with things that I am likely to forget. Things in this box include: a rain jacket, poncho, umbrella, gift bag, gloves. I also have a tiny cosmetic bag I keep in my console that has other items I sometimes am "desperate" for: mascara, concealer, hair ties, bobby pins, pens, pencils, post it notes. Having these things on hand when I am away from home saves me from running in the nearest CVS and buying them when I am out and about.

5 Things to Stop Wasting Money On | How to Save Money | Tips For Frugal and Simple Living | Goodness Grace Blog


#5: Anything you can buy with a coupon. Especially toothpaste, shampoo/conditoner, razors. You can seriously get these things for FREE. Like you, I don't have time to go through all the ads each week and compare items to purchase with coupons. Thankfully, there are some websites with wonderful people who do that for us. I can just click their website, quickly scroll for items that interest me, print what they tell me to print, and take them to the stores they tell me to take them to. Some of the websites I use for coupons are: TotallyTarget, All Things Target, and Krazy Coupon Lady. It's easier than you think! I don't use coupons for everything I buy, but when I see a good deal (especially a FREE deal), I buy a couple of the items. Remember, "have nothing in your house that you do not know to be useful or believe to be beautiful." This includes couponing for free things that you have absolutely no use for. You can, however, donate free things to local shelters or Goodwill Stores.

5 Things to Stop Wasting Money On | How to Save Money | Tips For Frugal and Simple Living | Goodness Grace Blog


Simplify. Organize. and have more space in your world for actually living. It's definitely worth it!


Sunday, November 3, 2013

Clearance Accent Table

There's something about cold weather that makes me really love being home. I'm still in the process of collecting furniture, but my budget doesn't allow for too much shopping, unfortunately.

The good news is, Target has some of my FAVORITE furniture and home decor which I can usually talk myself into buying because of their good prices. I especially love it when I find things on sale! I found this new side table at Target on clearance for $29.99. It has also been marked down online for $56.25 here. I have a Target RedCard, so it was an extra 5% off. 


And how sweet is that puppy in the picture frame? :) I know, I know. 


Here's a wide shot of my living room. By the way, I also purchased almost all of those pillows at Target recently too! Here's a link to their pillows. I'm a big fan of Target Coupons and Cartwheel, so be sure to check those for pillow deals before you buy any! Both of the light blue ruffle pillows are from Pier 1 Imports, but it has been several years since I purchased them. Here's a link to their pillows.


Wednesday, October 30, 2013

DIY Fabric Flower Lamp Shade


As soon as I recovered my burlap ruffle lamp shade, I was itching to recover the other plain lamp shade in my bedroom. 


I  purchased this lamp on sale at Pier 1 Imports for $39.99. I loved the base, but the solid, cream-colored lamp shade was basically begging me to change it somehow. 

I purchased plain white fabric (similar to bedding sheets) and cut it into 1.5 foot by 0.5 inch strips. I folded the strips in half length-wise and ironed them to press the fold. Then, I curled the strips into a tightly wound coil. I slowly released the coil in my hand, and let the fabric spread out naturally to reach the size of flower I wanted to use. I then and applied hot glue to the back (folded) side. 


Easy! It really doesn't have to be perfect. The variations and imperfects actually make it perfect. This project probably took me around an hour. 


Monday, October 28, 2013

DIY No-Sew Curtain

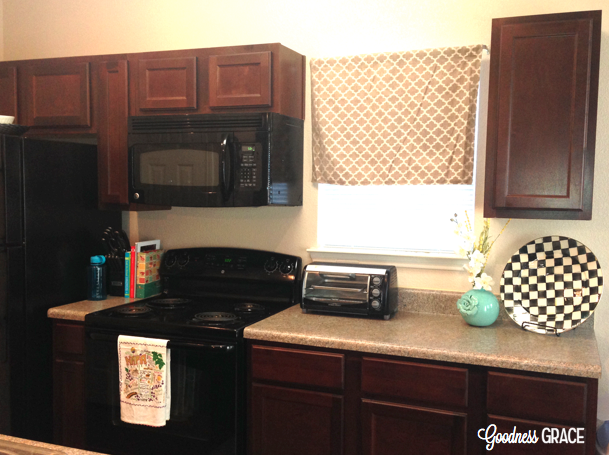
This was a perfect project for my grad-school budget and time frame :) It took about 20 minutes, and I used materials I already had at my apartment. 

I used about a half-yard of leftover fabric to make this curtain for my kitchen window. The width of my window was 22" so I cut the fabric 25" wide. I also cut it around 20" long. 

To avoid pulling out my sewing machine, I used Iron-On Hem Tape from Hobby Lobby for all of the seams. Here's how I did it:

I laid the hem tape right along the edges of the fabric. 


I placed the sticky side of the tape against the fabric and ironed it to the fabric. 


Then, I peeled off the white layer of the tape.


I folded the fabric just over the tape, and ironed it again. 


I used that process for the bottom and both side edges. For the top, instead of folding the fabric just barely over the tape, I folded over 2 inches before ironing the seam. This creates the pocket for the curtain rod to slide through.


Now I see that I should invest in an actual iron so I can get those wrinkles out :)


The whole project only took around 20 minutes! 


Monday, October 21, 2013

Easy Decor for All Seasons

These hurricane vases were purchased at Target. Here's a link. It's a super easy decoration for each holiday or season by switching the contents. 


Thursday, October 17, 2013

DIY Burlap Ruffle Lamp Shade

This lamp was purchased at a garage sale for $4. I bought it knowing I would do something to spice it up a little. I liked the base, colors, and size, and for $4, I couldn't pass it up! I wish I had a before picture of this lamp, but the original shade was a tan color with dark brown swirls on it. 


I found scrap burlap on sale at Hobby Lobby and purchased 2 yards. 


I cut the burlap 1.5 inches wide, and the length was 3x the length of the lamp shade. I folded the strips in half and ironed them so they would be pressed in half. I then put hot glue on the folded edge of the strips, and pressed it onto the lamp shade in different designs.  I didn't really have a pattern, I just pressed them down in randomly swirled designs. 


Honestly, the lamp doesn't produce an extremely bright light because the burlap blocks some of it.. but it actually looks pretty awesome when the light shines through :)