Showing posts with label Picture Organization. Show all posts

Sunday, December 29, 2013

Christmas Card Storage Display


Hello everyone! I hope you had a very Merry Christmas! I'm always looking for ways to preserve memories in a way that provides easy access and minimal clutter. I have saved all the Christmas cards I received the past few years, and have been trying to think of a way to save them and display them. I created these 7" x 3" card covers to combine all the cards from each year. It was actually SO easy and the entire project only cost around $7! 


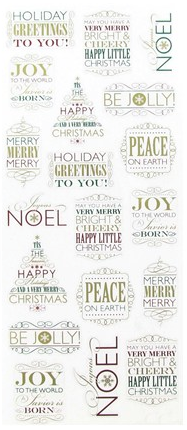
I went to my favorite store Hobby Lobby and found all of the supplies I needed for this project. I loved the Christmas Phrase Foil Stickers by the Paper Studio here. I loved the foil look and that some of them mention our beloved Savior. I also adored these Ornament Glitter Border Stickers by the Paper Studio here. To bind them all together, I used these Sterling Silver Open Jump Rings, found here. I'm sure as more of my friends begin having families and sending Christmas cards, I'll need to use bigger rings, but these worked perfectly for now!


I cut the red and green card stock paper to be 7" by 3". Most of the cards I received are 5"x7", so the 7" length made it look pretty uniform, but I wanted the length to be a little shorter so I could see some of the cards. The cream colored card stock paper is a little less than 5" by 2". I used a regular hole punch to make the holes on the card covers, then I laid the card covers over each Christmas card and traced the holes onto the Christmas cards using a pencil. This helped me hole punch in the right place on each card so they lined up. 


I had enough materials to make a few extras, so I made some for upcoming years too! I love them already and plan to place them out on the coffee table when I decorate for Christmas so we can look through them each year.

Merry Christmas everyone!

For unto us a child is born, unto us a Son is given; and the government will be upon His shoulder. And His name will be called Wonderful, Counselor, Mighty God, Everlasting Father, Prince of Peace. Isaiah 9:6-7.


Sunday, November 17, 2013

Digital Picture Organization


This project has been in process for approximately the past 2 years. I looooove looking at old pictures and cherishing old memories. Thankfully, my mom was very good at documenting every piece of my childhood through pictures. I'm talking 14 extra-full 12" scrapbooks FULL of my childhood. Plus a few boxes full of pre-scrapbook-days pictures. Each time I return to my parents' house, my sister and I look at old pictures. Most of the time I just snap photos of each picture with my iPhone, but sometimes I actually scan the pictures to my computer. Turning scrapbooks and other old pictures into digital photos has made it even easier to revisit all of these pictures and memories. 

Sorting the pictures is actually very easy! I created a new "Pictures" folder on my computer, and added subfolders for each person in my family. 


I then created subfolders for each person in my family. I used general ages to sort most of the pictures. For current pictures and in the future, I will probably sort them by actual calendar year. 


Now, I can easily find all of our family's sweet old pictures. This one of my grandma, mom, and aunts is one of my very favorites :) 


Sunday, November 10, 2013

DIY Chicken Wire Bulletin Board

I have pictures of my family and friends all over my apartment. I love taking pictures, and I love having them up to look at every day. My brother currently lives in Spain, and lot of my friends live in other cities and states, so seeing their faces in pictures every day makes everyone seem a {little} less farther away.

I found this big white frame in the attic at my parents' house. I went to Lowe's and purchased some chicken wire. The smallest roll of chicken wire I found was about 4ft x 10 ft. Let's just say I have enough left over to make an actual chicken pen. 

I wish I had more pictures for the step by step, but hopefully these finished-product pictures are explanatory enough. 


I laid the chicken wire over the frame and cut it about one inch bigger than the frame. I then nailed half-inch nails every 3-4 inches along the inside of the frame. If one of the pieces of chicken wire was near the nails, I twisted it around the nail. The other pieces of chicken wire are not attached to any nails, they just stay in place.


Picture Organization


Picture Organization Desk Decor


That's it really!